Back to TheWorxHub for Senior Living Main Menu
Completing a Work Order
You can mark a work order complete from the Dashboard in several different ways. You can complete a single work order, or batch complete multiple work orders at once.
Completing a Single Work Order
- From your Dashboard, use the categories under the Work Order section or the search field to find the work order you need to mark complete.
- Hover your mouse over the work order and click on the Complete link that appears.

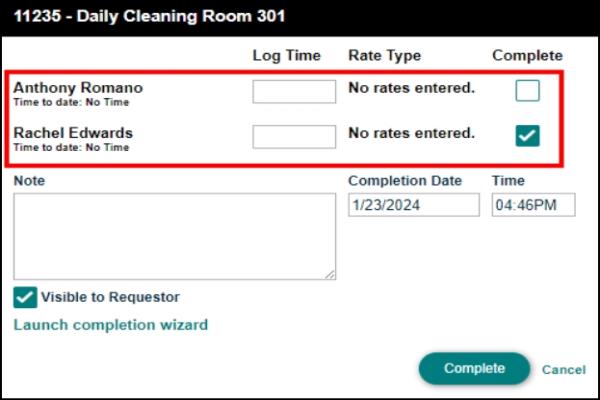
- In the pop-up box that appears, enter the labor time for each assignee. *Note: If you configured your Work Order Settings to Require Labor Time, without labor time logged for each assigned worker, the lightning bolt icon will not be displayed. When you click the Complete link, the Completion Wizard will open and the Complete button will be disabled. If you try clicking on the Complete button, you will be prompted with an error message until labor time has been logged.
- Fill out any other information as necessary and be sure to check the box next to Complete.
- Click Save. The work order will be removed from the dashboard. *Note: A work order is not officially complete until all complete checkboxes are checked for all assigned workers. Workers with their portion marked complete will not see the work order on their Just My Work dashboard indicator.

If you mistakenly complete the work order for one staff member, you can reopen the Completion pop-up, and click the undo? link where the complete checkbox used to be. Then click Save to reopen the work order for that person.
Batch Completing Work Orders
Work Orders marked with a lightning bolt ( ) symbol indicates that all required information has been entered and the work order can be batch completed. If the work order is not marked with a lightning bolt, some additional information is required before it can be marked completed in a batch. *Note: For example, once you turn on the Require Labor Time setting when configuring the Work Order Settings, these work orders without labor time logged are ineligible to be batch completed because they do not have the lightning bolt icon. A batch with any work orders missing required information cannot be batch completed, or they are prompted with an error message.
- From your Dashboard, check the box next to each work order that needs to be completed.
- Click the Complete link found above the records list.
- In the pop-up completion window enter a Note if necessary. *Note: Anything typed in the Note field applies to all work orders completed in the batch.
- Put a check in the box if you need to mark these work orders as Bill to Resident.
- Click Save to complete the selected work orders. The work orders will be removed from the dashboard.
Completion Wizard
The Completion Wizard is a convenient process that presents each of the work order panels that are relevant for closing and billing work orders. The Completion Wizard is accessed from work orders that do not have a lightning bolt icon and require additional information before being marked complete. *Note: If any of the Completion Wizard sections do not apply to this work order, you can click Complete WO at any time to skip to the end of the Completion Wizard.
- From your Dashboard, hover your mouse over the work order and click Complete. *Note: The Completion Wizard will launch automatically if a worker has not been assigned to the work order.
- Click Launch completion wizard from the Quick Complete window.
Fill out the following sections:
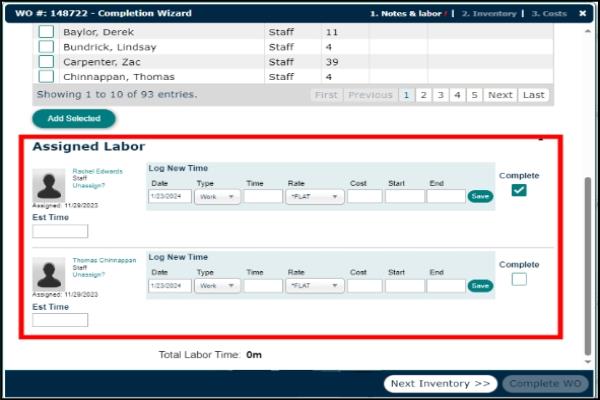
- Notes & labor
- Enter notes and completion date and time.
- Add or remove workers from the work order and labor time for each. *Note: If you have configured your Work Order Settings to Require Labor Time, all assignees must have at least 1 minute of time logged; otherwise, the Complete button will be disabled, and the system will not allow them to complete the work order.
- Meters
- This step will show if the work order has any associated meters that require a meter reading before completing the work order.
- Inventory *Note: Only accounts with the Inventory module will see this section.
- Add or remove inventory items used on the work order.
- Costs
- This step will display any Staff, Contractor, or Inventory costs that have been automatically added to the work order based on the previous steps.
- To add a Cost manually:
- Click Add Cost.
- Select either Purchase Cost or Contract Labor / Service Cost.
- Complete all required fields and provide any other applicable information.
- Click Add Purchase Cost or Add Contract Labor Cost to finalize the changes.
- Billings
- Enter the billing information otherwise found on the billings panel in the work order.
Completing a Work Order with Labor Time Setting
When the Require Labor Time setting is OFF & multiple people are assigned
-
When completing a work order from the Completion Wizard or Quick Complete, the user signed in will have their name selected.
-
They must select the other names if they wish to complete the work order for others instead of just their portion.

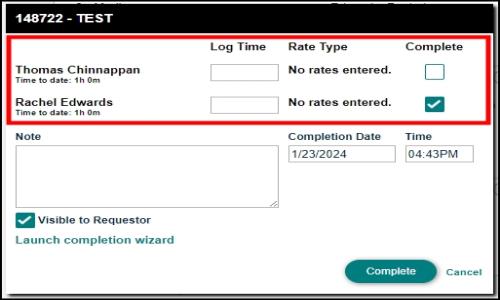
When the Require Labor Time setting is ON & multiple people are assigned
-
If no labor time has been logged yet, the work order is not eligible for quick complete, and the Completion Wizard will open.
-
In the Assigned Labor section, the technician who is signed in will have their name selected. They must add time before they can continue with completing their portion.
-
If labor time has already been logged and the work order is eligible for quick complete, the technician who is signed in will have their name selected.
-
For users who have the proper permissions and wish to complete the work order for others, they must select the other names in both the Quick Complete and Completion Wizard scenarios.
